Posts RSS Subscribe to Feed
Sign Up for Latest Recipes!

Tatsuta Fried Chicken

Monday, April 28, 2008 | Labels: , , | No Comment »

Toriniku tatsuta-age

Recipe from Book of Practical Japanese Cooking

According to the authors, this dish takes its name from the Tatsuta River, near Nara which hs a long history as one of the most famous places to celebrate fall and the changing colours. The batter for this chicken is light as it's mostly egg white and corn starch. The slivers of ginger and green onions incorporated into the batter imparts a fragrant aroma. Deliciously crunchy and should be a crowd favourite. The bell pepper shapes provide a decorative touch.

Photobucket

Ingredients:
1 pound boned chicken thighs
Vegetable oil for deep-frying
1 red pepper
1 bell pepper
cornstarch
4 lemon wedges

Marinade:
2 tbsps dark soy sauce
2 tbsps sake
1 tsp fresh ginger juice

Batter/ Coating:
2 egg whites
2-3 tbsps cornstarch
2 tbsps finely chopped green onions
1 tbsp finely chopped ginger

Method:
Cut the chicken into 1 inch squares. Combine the seasoning ingredients and marinade for about 30 minutes. Preheat the oil to a low deep-frying temperature (330 F). Core and seed the peppers. Use mini cookie cutters to create the decorative shapes.

For the batter, beat the egg whites until frothy but not stiff. Add the cornstarch and mix well. Add the green onions and ginger. Dredge the chicken in cornstarch and then cover well with coating mixture. Deep-fry the chicken. Remove from oil before the chicken becomes too brown. It should fry gently. Deep-fry the pepper shapes for about 30 seconds. Arrange chicken pieces and pepper shapes on serving plates. Great with rice or as a snack.


Bookmark and Share

Sake Simmered Chicken

Friday, April 18, 2008 | Labels: , , | No Comment »

Recipe adapted from Book of Practical Japanese Cooking by Shizuo Tsuji and Koichiro Hata

Yup, another great recipe from my favourite Japanese cook book. This is easy to cook but requires a longer time (> 1 hour) to complete due to the various stages of simmering involved. Before I completed the dish, I did wonder about the lack of garlic or ginger in the recipe. However, tasting the chicken TOTALLY proved my doubts unfounded. The chicken tasted ichi-ban (loosely translated to first-rate in this context). The chicken legs are simmered in their own broth and then at a later stage in sake and sweetened with mirin and some sugar. The slow method of cooking totally allows the fragrant chicken broth and sake flavours to seep into the meat, making every single bite an absolute pleasure. Now, you can cook like a Japanese chef at home!

Photobucket

Ingredients:
2 whole chicken legs (thighs and drumsticks)
2 inch length konbu (kelp)
5 stalks green onions (only the white part)

For simmering:
5 cups water
7 tbsps sake
2 tbsps mirin
2 tbsps sugar
3 tbsps dark soy sauce

Method:
Cut the chicken legs apart at the joint. Drop into boiling water until the colour changes. Transfer into cold water and drain. Set aside.

Combine the chicken, kelp and water for simmering in a pot. Cover with a drop-lid (this is to ensure that the flavours seep right back into the chicken), alternatively you can simply cover with parchment paper right on top of the food (make a little hole in the middle for steam to escape). Place over high heat. Just before water boils fully, remove and discard the kelp. Bring to a boil and reduce heat to low. Simmer until the liquid is reduced to about one-third (takes about 1 hour).

Add the sake, mirin and sugar. Simmer for 5 more minutes and add the soy sauce. Simmer for a final 5 minutes, remove from heat and let the chicken cool in the liquid. Once the chicken has cooled, remove from the simmering liquid and remove the bones. Discard the bones and return the chicken to the pot. Reheat over high heat and boil, occasionally spooning the liquid over the chicken until the liquid is reduced by half. Add the onions and heat through quickly. Serve.

Tip: If you opted to use boneless chicken thighs, you can of course skip the last step (deboning and returning chicken to the pot)

Bookmark and Share

Seafood Claypot 海鮮煲

Thursday, April 17, 2008 | Labels: , , , | No Comment »

I love food cooked in claypots for some reason. So I decided to cook a mini seafood claypot for a quick dinner. I used bay scallops, crabstick, snow peas and chinese cabbage as the main ingredients. You can always add other ingredients of your choice, for example, shrimp, squid, mushrooms, tofu - the list goes on. This dish combines mainly mild-flavoured ingredients. The seafood and Chinese cabbage impart a natural sweetness to the dish while the snow peas provide an added crunch. I added cute little flower shaped carrot slice for some colour. Again, another extremely simple dish that you can throw together with stuff from a well-stocked fridge. You can opt to use a wok or a pot to cook this dish in if you don't have a claypot. But to be honest, I got the idea to use a claypot tonight because the other pans were still in the dishwasher!

Notice the flower shaped carrot slices?
Photobucket

Ingredients:

1 cup bay scallops
1/2 cup crabstick, chopped into bite sized pieces
2 cloves garlic, sliced
4 slices ginger
3 tbsp light soya sauce
Salt & pepper to taste
1 tsp sugar or to taste
Dash of sesame oil
Dash of Shaoxing Wine
Packet of snow peas
1/2 Chinese cabbage, cut into 1 inch pieces (for easier cooking)
1 carrot, sliced
1/2 cup Chicken Broth (or you may just substitute with water)

Steamy claypot!
Photobucket

Method:

First, heat up some cooking oil in your wok/pan/ claypot. Saute the garlic and ginger slices till fragrant. Turn the heat down (to medium low) and add the soy sauce and Shaoxing wine. Now add the seafood of your choice (in this case, scallops and crabsticks) into the pot and saute until half cooked. Next, pour the chicken broth (or water) into the pot and bring to a boil. Add the sugar and season with salt and pepper to taste. Lastly, add the vegetables, the snow peas first as they take slightly longer to cook and finally the chinese cabbage. If you prefer the broth to be thicker, add some corn starch to the pot. Also, if you're using mushrooms, add those before you add in the vegetables. Lastly, add the dash of sesame oil. Serve hot.

For other seafood recipes try:

Tomato Garlic Shrimp Recipe

Chinese Steamed Copper Rockfish

Fried Fish in Garlic and Shallot Oil


Bookmark and Share

Ginger Chicken with Fresh Shitake Mushrooms 東菇姜雞

Wednesday, April 16, 2008 | Labels: , , | 2 Comments »

Another easy dish which is a family favourite that has been prepared in my home back in Malaysia many times. I love the texture and bite of the mushrooms. With fresh shitake mushrooms, preparation time is a little shorter as you do not have to soak them in water before cooking as compared to their dried counterparts. Equally good served with rice or noodles. Of course, you can always substitute the fresh mushrooms with the dried ones - just remember to soak them!

Photobucket

Ingredients:

1 tbsp cooking oil
4 chicken thighs, chopped
6 slices ginger
4 cloves garlic, minced
10-12 fresh shitake mushrooms (cut off the stalks)
1 stalk green onion, chopped (save the green parts for garnish)

Fresh shitake mushrooms
Photobucket

Sauce:
2-3 tbsp light soy sauce
2 tbsp dark soy sauce
Dash of sesame oil
1/4 cup water
1-2 tsp Shaoxing wine
Pinch of sugar

Method:

Firstly, heat up your wok/ pan until hot. Now, add the cooking oil to the wok. Next, add the garlic, ginger slices and a handful of chopped green onions (the white part) into the oil. Saute until fragrant - make sure to turn the heat down to low/ medium to avoid burning the garlic. Now, add in the chopped chicken thighs (easier to get boneless thighs) and stir around with the garlic, ginger and green onions. Proceed to stir the ingredients for the sauce in a separate cup and pour into the wok. Turn up the heat and allow to boil. Once it starts boiling, add the mushrooms and turn the heat down to low. Please add more water if you see fit to do so and adjust the ingredients for the sauce accordingly to taste. The mushrooms are added last as they are highly absorbent and cook easily.

The cooking time should take about 20-30 minutes, keep a close watch to avoid the sauce drying out. Of course, make sure the chicken is cooked before serving!

For other poultry recipes:

Kung Pao Chicken Recipe

Steamed Salted Chicken Recipe

Glazed Chicken Duo Recipe

Deep-fried battered chicken thighs

Bookmark and Share

Assorted Sushi 什錦壽司

Sunday, April 13, 2008 | Labels: , , | No Comment »

Some recipes from Book of Practical Japanese Cooking.

What a pretty picture!
Photobucket

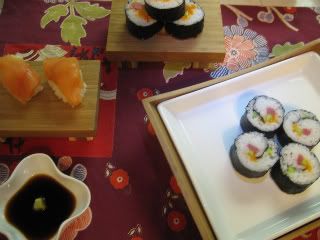
I love sushi so I decided to try my hand at making some tonight. Making or rather assembling sushi is not as easy as it seems, practice definitely makes perfect! But, I am really proud of myself today, hehe... If one carefully follows instructions, an almost perfect looking sushi is not as elusive as it may seem. The sushi rice is particularly important - using Japanese sushi rice is imperative to ensure the right consistency and of course to avoid the sushi from falling apart easily. For tonight, I made some decorative sushi which resemble colourful brocade balls that Japanese children play with (Temari-zushi), some commonly seen nigiri sushi and some maki sushi (rolled sushi). One can be especially creative with assembling the rolls, use whatever ingredients that may suit your fancy and experiment!

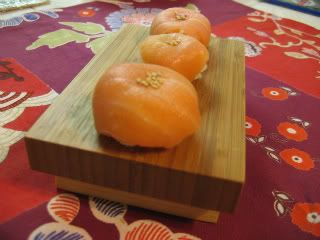
Temari-zushi pictured below, look at how adorable these little sushi balls are! 多可愛!
Photobucket


To assemble the above:
Slice at an angle the salmon into square pieces. Make 6 small, loose balls of sushi rice about 1 inch in diameter. Soak a piece of gauze in Hand Vinegar (1 cup water with 2 tbsp rice vinegar) and wring it out well. Set a square of fish on the gauze, season with a small amount of wasabi and place a small ball of rice on the fish, then wrap the gauze around the sushi and twist to finish shaping. Make a shallow depression in the center of the top with your finger, unwrap and sprinkle with some sesame seed.

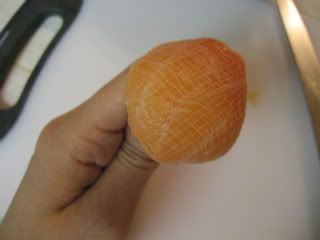
Use a piece of gauze or cheesecloth wet in Hand Vinegar to gently twist and 'shape' the sushi ball:
Photobucket

Nigiri Sushi

Photobucket

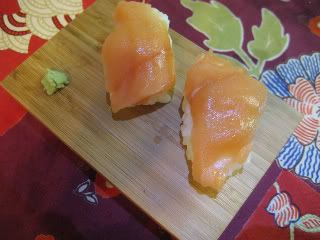
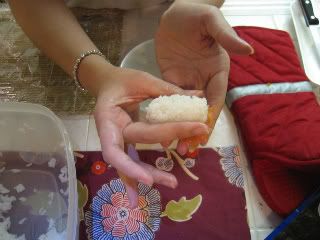
To assemble/ shape: Again, moisten your hands with Hand Vinegar (to avoid rice sticking to your hands), take a small amoust of sushi rice (about 1 1/2 rounded Tbsps) and cradle it in your right hand at the base of your fingers (pictured below). Crimp to form a rectangular block about 2-2 1/2 inches long with rounded edges and sides. Place a piece of salmon in your palm near the base of your fingers, spread a little wasabi on the fish - next press the piece of rectangular sushi rice onto the salmon. Shape by pressing the sides of the rice and 'mould' it to the fish. You can top with other kinds of sashimi grade seafood like toro (tuna), ebi (shrimp), unagi (grilled eel) or even tamago (egg).

Press the sides of the rice gently with your fingers to form the rounded rectangular shape:
Photobucket

Assorted Rolls (Maki Sushi):

For maki sushi, you will need a bamboo rolling mat. It's easier to simply wrap the bamboo mat with cling-film (food wrap) to avoid the food from getting onto the mat. This is because bamboo mats should not be washed - it should be simply brushed and left to air-dry. Rolling the sushi requires some careful attention - for instance, for the simple roll I made pictured below, simply place the nori sheet onto the wrapped mat, wet your hands in Hand Vinegar and put some sushi rice all over the sheet (filling two-thirds of the sheet). Place the ingredients horizontally, in an almost straight line, one ingredient about 1 inch from the other. Next, simply roll by curling up the edge closet to you, press with mat, roll up about 1 inch, press again, and continue to the end of the rice. Remember to wet the ends of the seaweed to ensure they stick together.

When cutting, wet your knife in Hand Vinegar each time (flick your wrist gently to remove excess water), this will ease the cutting of the rolls and prevent the rice from sticking to your knife.
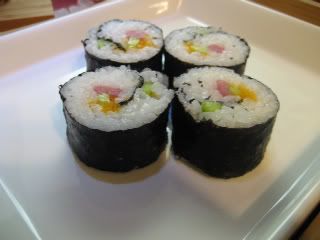
My maki rolls
Photobucket

Photobucket

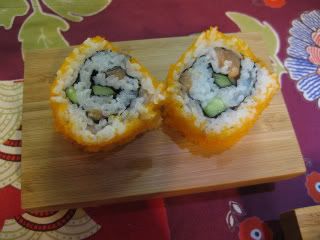
This (below) is a variation of maki roll where the seaweed is on the inside of the sushi. Simply fill up the whole sheet with rice. Turn it over onto the mat. Place the ingredients on the top side of the sheet now and roll as above. Roll the outside of the sushi onto some salmon roe.
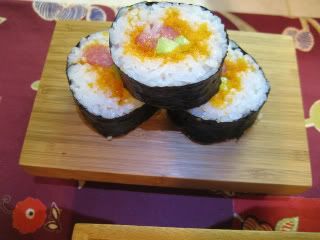
My uramaki roll
Photobucket

Spreading the roe onto the outside of the roll:


To make Sushi Rice:
Cook 2 cups of sushi rice as you would normally. However, before actually cooking the rice in the rice cooker, place the washed uncooked rice in a colander and let it expand for about 30-60 minutes. This additional step will ensure a better consistency for assembling sushi later.

Sushi dressing:
1/2 cup rice vinegar
5 1/2 tbsps sugar
1 1/2 tbsps salt
1 inch length konbu (kelp)

Mix the ingredients above together and heat until sugar dissolves.

To prepare the rice:
When the rice has finished cooking, turn it out into a large bowl (preferably wooden). Slowly pour about 2/3 cup of the sushi dressing (which should be cool - you can force cool the dressing by placing the bowl in iced water). into the cooked rice and mix by 'slicing' across the rice instead of mixing in a circular option with a rice paddle. Mix well and let cool to room temperature. Once cool, mound the rice in the center and cover the bowl with a damp cloth and the rice is ready for use.

As you can see, assembling sushi does require a fair amount of time and patience, but the results are definitely worth it!

Other Japanese Recipes:

Simmered Rockfish (Mebaru Nitsuke)

Deep-fried Rockfish Cheeks with soy-bonito sauce

Japanese Clam Soup

Cold Soba Noodles with Dipping Sauce

Deep-fried Rockfish Boat

Bookmark and Share

Steamed spare ribs with ginger 薑汁蒸排骨

Tuesday, April 08, 2008 | Labels: , , | 4 Comments »

I always order steamed spare ribs in ginger whenever I go for dim sum (點心). So, I took a few pieces of spare ribs to re-create that dish tonight. Anyways, it's rather easy to make the steamed spare ribs and also there is lesser mess due to the absence of deep-frying and the like that is involved for the King To Spare ribs.

Photobucket

Ingredients:

Spare ribs, cut into 1 inch pieces
4 slices ginger
1 stalk green onion, chopped coarsely
1 clove garlic, sliced
1 tsp mirin
2 tsp soy sauce
Dash of sesame oil
Pepper and salt to taste

Method:

Place the spare ribs on a plate. Pile the ginger, green onions and garlic slices on top. Put the mirin, soy sauce and sesame oil onto the pork. Steam for about 15 minutes. Remove from heat and place into another dish. Garnish with some green onions and chilli peppers if you wish.

Other spare ribs recipes:

Audrey's (My Mom's) King To Spare Ribs

Watercress and Spare Ribs soup

Chinese Daikon Spare Ribs Soup


Bookmark and Share

Foil-wrapped Salmon Fillets

Saturday, April 05, 2008 | Labels: , , , | No Comment »

This was a dish I just thought up very quickly - simply wrap the salmon in foil and bake in the oven. Basically, I had to think of a quick, easy way to deliciously deplete of the lone salmon fillet sitting in my freezer. This is exceedingly simple and very rustic looking as well.

Photobucket

Deep-fried Rockfish Boat

Friday, April 04, 2008 | Labels: , , | 2 Comments »

This is just a fancier version of deep-fried fish. The twist is just that the bones of the fish are also deep-fried to a golden brown and can be eaten as well. The flesh of the fish is first removed and set aside. The bones of the fish including the head and the tail are deep-fried separately. This dish is called a 'boat' simply because when you fry the fish (without the flesh), the fish should curve up forming a boat-like structure. A very simple dish presented in a 'fancier' way that tastes delicious and looks great. You may substitute the rockfish for any other small white fleshed fish e.g. flounder, halibut. It is also important to measure the temperature of the oil while deep-frying as different temperatures are needed for frying the bones and the fillets.


Photobucket

Ingredients:

1 small sized rockfish
Flour for coating
Enough vegetable oil for frying
Glass noodles (1 small packet) - optional

For the lemon soy-dipping sauce (adapted from Book of Practical Japanese Cooking) which is basically ponzu (can be purchased bottled from most Asian stores):

7 tbsp lemon juice
7 tbsp dark soy sauce
5 tbsp rice vinegar
5 tsps mirin
1 tbsp tamari soy sauce
1/4 cup loose bonito flakes
1 inch length kelp (konbu)

Photobucket

Method:

Heat up the cooking oil until it reaches 330 degrees fahrenheit. Cut each fillet of the fish into 1-2 inches sized pieces. Dredge the pieces and the bones in flour. Deep-fry the bones slowly and try to hold up the head to ensure the 'curve' of the boat. This step works better with flat fish i.e. flounder/ halibut than it did with my little rockfish.

Once the bones have browned and turn crisp, remove from oil and set aside on some oil-absorbent paper. Now, turn the heat up until the oil reaches 350 degrees fahrenheit. Deep-fry the fillet pieces till golden brown. Remove and set on oil-absorbent paper.

The sauce is made by simply combining all the ingredients together. Refrigerate for 24 hours, remove the kelp. Strain though either a piece of cheesecloth or coffee filters to clarify. Of course, at this point, just buying a bottle of ready-made ponzu will sound very attractive!

Place the fish bones (hopefully with the head still attached) onto a dish. Heap the deep-fried fillets on top of the fish bones (where it's flesh should have been). If you wish, garnish with some green onions. The glass noodles should be cut into 2 inch pieces and deep-fried (again, this is optional, just adds to the texture and the look of the dish). The glass noodles will immediately puff up and turn white. Remove from oil. I simply laid the puffed up noodles on the dish, then my fish bones and lastly the fish fillets. Serve with the dipping sauce. You may also just serve the fish with lemon juice flavoured to taste with some salt.

For other fish recipes:

Please click here for Steamed Rockfish Recipe

Please click here for Deep-fried Rockfish Cheeks Recipe

Please click here for Fried fish with special sauce recipe

Please click here for Simmered Rockfish Recipe

Please click here for Fried Fish with Garlic and Shallot oil Recipe
Bookmark and Share


Steamed seaweed rolls 蒸纸蔡卷

Friday, April 04, 2008 | Labels: , , , | No Comment »

Dim Sum is one of my favourite Chinese inventions. I love looking at all the dainty little dishes of bite-sized food and taking my pick especially at the old-fashioned tea-houses where 'little old ladies' still hawk their wares on huge wooden trays (yeah, instead of carts). I think the last time I had dim sum in this fashion was in Hong Kong, at the famed Luk Yu Teahouse. Still intact with its' 1930s rosewood furniture and accesorised with exceptionally rude waiters - this is traditional Chinese dim sum at its' best! Anyhow, seaweed rolls have found their way into the dim sum repertoire - usually deep fried.

The filling/ stuffing is similar to wonton or siu mai filling i.e. usually a mixture of shrimp, pork and scallions if you so prefer. This time, I decided to steam the rolls in the interest of a lower calorie and healthier meal.

Photobucket

Ingredients:

5 roasted nori sheets (roasted seaweed used for rolling sushi)

For the stuffing:

1/2 pound ground pork
Dash of sesame oil
2 tsp light soy sauce
1/2 pound minced shrimp
1 tbsp scallions, chopped finely

You will need a bamboo rolling mat.

Photobucket

Method:

Simply mix the stuffing together in a bowl. You may opt to use shrimp alone or just pork depending on your preference. The concept is the same as that of rolling sushi. Simply spoon the filling into the middle of your nori sheet which should be on top of your bamboo rolling mat. Roll carefully, taking care not to squish the pork or shrimp all over the kitchen. Wet the ends of the sheet with water for them to stick together. Steam the rolls whole until cooked which should take about 15 minutes. Finally, simply cut them up into neat little sushi-esque rolls. I sprinkled some coloured egg yolk atop mine for some colour.

Tip: Steam the rolls as soon as they are done to minimise soggy seaweed.

Bookmark and Share

Tomato Garlic Shrimp 蒜蓉茄汁炒蝦

Wednesday, April 02, 2008 | Labels: , , | 4 Comments »

This dish is sweet and spicy with the added fragrance of garlic. Take care not to add water as the resulting sauce should be thickish and stick to the shrimp. Very appetising and rather simple to make! This sauce works well with crab as well but with crab, an egg will be needed.

Photobucket

Ingredients:

1 pound medium sized shrimp (deveined) - it is up to you if you want to shell them or not, I like to cook mine with the shell on

For the sauce:

3 cloves garlic, minced finely
2 tbsp ketchup
1 tsp sugar
1 tsp honey
2 tsp light soy sauce
Pinch of salt
2 chilli peppers (seeded if you don't want the dish to be too spicy)


Method:

Saute the garlic and peppers in hot oil (about 1 tbsp) until fragrant. Turn to medium heat and pan fry the shrimp until almost cooked. Mix the sauce ingredients in a bowl. You may add sugar if you think the sauce is not sweet enough. Next, turn the heat down to low and pour in the sauce, coating the shrimp well. Make sure the shrimp is cooked before dishing out. This should only take another 2-3 minutes to avoid over-cooked shrimp. Dish out and garnish with green onions if you wish. Serve hot.


Please click here for my Sweet and Spicy Prawns Recipe

Bookmark and Share

Steamed salted chicken 蒸鹹雞

Tuesday, April 01, 2008 | Labels: , , , , | 5 Comments »

As the name of this dish implies, the chicken is simply steamed with green onions, a little ginger and is salt-rubbed before hand. For added flavour, you may add cilantro (optional) before steaming. The resulting chicken broth is very flavourful and in my opinion was the highlight of this dish.

Photobucket

Ingredients:

2 whole chicken legs
2 stalks green onions
Handful of cilantro
2 slices ginger
1/2 tsp sesame oil
1 tsp cooking oil
Salt - about 4 tbsp (or to taste)

Method:

Rub the chicken with the salt. Place the green onions, ginger and cilantro atop the chicken. Add the sesame oil and cooking oil into the dish. Steam for about 20-30 minutes. Serve hot with rice.


Bookmark and Share

Related Posts Plugin for WordPress, Blogger...
Creative Commons Licence
Smoky Wok by Smoky Wok is licensed under a Creative Commons Attribution 3.0 Unported License.
Based on a work at www.smokywok.com.
No content from this website including images, recipes, writings may be reproduced without prior consent from the author.


Smoky Wok

Smoky Wok

Smoky Wok