Posts RSS Subscribe to Feed
Sign Up for Latest Recipes!

Easy Roast Duck Breast with Pancakes Recipe - 簡單烤鴨和煎餅

Monday, November 28, 2011 | Labels: , , , , | 15 Comments »

Another week has passed - time really flies and I was in an admittedly premature Chinese New Year mode when I styled today's photos, the fuchsia pink backdrop is my little nod to Chinese New Year :O.  Well, festive occasions or not I do love roast duck and especially when wrapped in some pancakes with some scallion 'flowers'.  This dish was inspired by the famous Peking Roast Duck but do note that this is my inspired version made at home that is rather different but still makes for a tasty and elegant meal for your family or guests.  For most home cooks like yours truly, recreating an authentic Peking Duck at home is almost impossible - well firstly, the ducks are not roasted in regular ovens, they are supposed to be roasted over open flame lit with a special kind of wood that is also infused with fruits and some dates.  For the duck to get that gorgeous crispy skin characteristic of a true Peking Duck, the ducks also have to be rotated and turned at precise times.  Sounds a tad impossible to me for most home cooks - well at least to home cooks like me, so sometimes certain dishes should be left to the experts, I think.

Chinese Roast Duck with Pancakes

Anyway, I merely roasted some duck breast today in a sweet and savoury hoisin sauce-based marinade and made some thin pancakes to go with the duck.  The dish turned out very well and was very well received I must say so I'm quite sure you will like this dish. Using only duck breast also makes it easier as you don't have to carve anything (I'm really not that great with carving), and serving the duck with pancakes and the cute scallion flowers will be sure to impress your guests.  This is also one of those Chinese dishes where guests get to be 'active' at the table and can wrap their own little pancake rolls.  I have had Peking Duck at some restaurants where the servers will very conveniently wrap up the pancakes for you but for me, I think that takes out some of the fun, what do you think?

Chinese Roast Duck with Pancakes

GUEST POST: Soufflé Cheesecake

Saturday, November 26, 2011 | Labels: , , , | 6 Comments »

I am very happy to introduce Yanse from A Wonderful Life on the 24th Floor which is a beautiful baking blog written in Chinese.  Yanse is an avid photographer and part-time baking instructor who lives in Beijing - I got to know Yanse via her Flickr photo stream recently and we have been sharing so many stories both food and well non-food related.  Seeing that I am such a huge fan of her baking projects and food photos I thought it would be nice if she could share one of her lovely recipes with my dear readers.  She has kindly agreed for me to share her cottony-soft soufflé cheesecake recipe and photos for today and I do hope you will enjoy this.  This cheesecake is not of the dense New York variety but it is more reminiscent of the Japanese versions which are feather-light and just utterly delightful.  If you can read Chinese, do hop over to her blog but if not, take a look at her photo stream for some tempting eye candy.  

亲爱的妍色,今天真的很謝謝你讓我跟我的讀者分享你這麼漂亮和美味的一个芝士蛋糕食譜!

(Yanse, thanks so much for allowing me to share your gorgeous and delicious cheesecake recipe with my readers today!)

Photobucket


Green Beans Stir-fry with Shallots and Pork Recipe

Friday, November 25, 2011 | Labels: , , | 4 Comments »

I hope that you are all having a good week!  A good and easy stir-fry is always welcome in my books - it allows one to combine usually some vegetables with a protein of your choice and today's feature is as simple as it gets.  Green beans are stir-fried with some shallots for a natural sweetness and some thin slices of pork, very much a 'rice-puller' if there is such a term.  This is a great recipe to tuck away for those tired weeknights and you can substitute the pork with shrimp or just keep it vegetarian by eschewing the protein.  This is altogether a very nutritious and simple dish, you may not find this humble dish on the regular menus of most Chinese restaurants but this is a much-loved dish in a lot of Chinese households.  


Green/ French Beans Stir-fry

Chinese Steamed Glutinous Rice Recipe

Wednesday, November 23, 2011 | Labels: , , , | 8 Comments »

It has been a hectic start of the week for me in the mental sense but I am so happy to report that the mental stress was mostly unnecessary and things are progressing well.  Sorry for being so vague but I can't reveal too much at this point although I just wanted to share some positivity with you.  It is at times like these that I am glad I tucked away a recipe or two from earlier to feature as I have not had the time to cook anything the past couple of days. For today, may I present my mom's tried and true recipe for Chinese style steamed glutinous rice.  If you've noticed, most of my mom's recipes are quite simple, on point and just deliciously comforting - not to mention usually easy to prepare as well since although my mom loves cooking, she is not the type who will labour for hours in the kitchen.  Apparently, I take after my late maternal grandmother who enjoyed making steamed buns (baos), Chinese cakes and a lot of other usually store-bought food from scratch.  I like to think I have the best of both worlds - I enjoy whipping up a simple (full of wok breath, please) stir-fry and enjoy making slightly more complicated dishes like steamed rice rolls from scratch :O.


Chinese Steamed Glutinous Rice 蒸糯米饭

Steamed glutinous rice is even easier to make than the stir-fried version as you only need to stir-fry the ingredients of your choice separately then mix them together with the soaked glutinous rice and simply steam the whole mixture until cooked.  The fried version results in a more fragrant and more toothsome dish whereas the steamed version produces a softer textured dish which is no less tasty but of course requires much less 'work', so the choice is yours.  

Photobucket 

This post is part of my Yuen Chun Recipes, an ongoing project on this blog.

Chinese Red Bean and Salted Egg Yolk Flaky Pastries - 豆沙咸蛋酥

Saturday, November 19, 2011 | Labels: , , , , | 18 Comments »

I am the type who loves the salted egg yolk in mooncakes, flaky Chinese pastries and well you get the drift - so it was only fitting that I make one of my favourite Chinese pastries at home at least once right?  I was very happy with the results today as the skin was perfectly flaky and light as feather while the filling was just the right amount of sweetness from the red bean paste and savoury from the salted egg yolk.  I can't really say that these are 'easy' to make at home as everyone has a different measure of what is 'easy' or 'difficult' but I can say that this will take some time although not as long as say making classic French puff pastry.  There is only one turn involved and although this pastry involves a lamination of sorts, it is much easier as all you need to do is wrap the oil dough which will be shaped into a ball with the outer oil 'skin' instead of perfectly laminating it.  Both the oil dough and the oil 'skin' are relatively easy to handle even in humid weather like Malaysian weather but if this is your first time working with shortening, the texture may take a little getting used-to.


Chinese Flaky Pastries with Red Bean Paste & Salted Egg Yolk 豆沙咸蛋酥

You can use whatever filling you like for example, lotus paste, century eggs instead of salted egg yolks or yam paste.  For me, the highlight of these popular flaky pastries is well, the pastry itself - the hard part is getting the pastry right but then if yours truly can do it, so can anyone provided you are ready to dedicate some time and effort to it.  You can of course run out and buy these but there's a great sense of satisfaction when you realise you can actually make these in your own kitchen should you choose to, don't you think? :D So if you like classic flaky Chinese pastries, I really recommend for you to try making these at least once at home, you can have so much fun with the filling and impress your guests (and yourself).

Chinese Flaky Pastries with Red Bean Paste & Salted Egg Yolk 豆沙咸蛋酥

I hope you all have a good weekend and perhaps keep this easy recipe for one of your weekend baking projects?  These are excellent with a hot cup of Chinese tea by the way.  

GUEST POST: Bacon Ricotta Mashed Potatoes and Happy Thanksgiving!

Thursday, November 17, 2011 | Labels: , , | 16 Comments »

Please welcome Kelvin of Kelvin Wu Photography a blog I have been following for both its' delicious recipes and mouthwatering food photos. Kelvin is an avid photographer and cook who lives in Holland and apart from the delicious food photos, he also shares his stylish work in travel and wedding photography.  He has very kindly shared one of his favourite recipes for Thanksgiving on Smoky Wok today and please do hop over to his blog to check out more of his work. Kelvin, thanks for sharing with us!

Why would you wait for Thanksgiving? You can eat this everyday! Unfortunately, we don't have Thanksgiving in the Netherlands... Isn't it just an excuse to eat a lot? :p

Today, I'm going to share one of my favorite mashed potatoes recipes. This recipe has the following ingredients and it serves two.

Photobucket

Heartwarming Chicken Congee...

Wednesday, November 16, 2011 | Labels: , , , , | 11 Comments »

Heartwarming and delicious congee that is silky smooth and flavourful - always a winner with me.  When I was a child, I never appreciated congee in all its' delicious comforts as I was always forced to have congee when I was sick so I of course started associating it with being sick, not a positive connotation as you can gather.  Times have changed however and I totally get why congee is so popular amongst us Asians especially -  congee can be cooked simply with a bit of salt and served with other dishes or made luxurious with the addition of abalone.  Congee or rice porridge has humble beginnings and I believe that it was an accidental 'invention' by the peasants in old China in their quest for a fulfilling yet less costly meal, not everyone was able to cook rice for every meal and even if rice was used, the rice varied drastically in quality.  The type of congee I prefer is of the silky smooth consistency (more Cantonese I think) while some others love the Teochew style of congee where the grains of rice can be distinguished clearly against the liquid.

Chicken Congee for the Cold Weather! 温暖的鸡粥...


Chicken congee is always a favourite and today I am sharing an extremely easy method of making this at home.  If you have time, soak the rice for at least 30 minutes before boiling as this will help break the grain up quicker ensuring a smoother consistency.  The congee was boiled in a mixture of water and organic chicken broth with a piece of ginger thrown in.  Add in the chicken breast or thigh slices after about 30 minutes, serve with some green onion slices, ginger slivers and some soy and sesame oil on the side - wholesome and comforting meal ready.

Chicken Congee for the Cold Weather! 温暖的鸡粥...

What is your favourite season of the year? Whenever the cooler months are here, congee comes to mind and although I am now in perpetually hot Malaysia, I can still taste the pleasure of heartwarming congee in the cold cold winter :O.


Chinese Steamed Pork Buns/ Baos Recipe - 菜肉包 with Step-by-Step Photos

Tuesday, November 15, 2011 | Labels: , , , | 14 Comments »

It's probably no secret that steamed buns are one of my and probably a lot of fellow Asians' favourite comfort food and I'm back today with a savoury version, the classic steamed buns or bao filled with pork and vegetables (bok choy in this case).  Making Chinese steamed buns at home is not difficult but then again, it does require a bit of time and dedication - as I have received quite a few questions from some of you about making steamed buns, I thought it would good to post an even clearer photo tutorial from my previous attempt with a savoury example this time. I know that sometimes it can get frustrating when you're not sure how the dough is supposed to look like or realise just how easy it the process actually is, in cases like these a photo is definitely worth a thousand words.  I hope that you will find this improved photo tutorial even easier to follow and 'demystify' so to speak the process of making Chinese steamed bao at home.


Homemade Chinese Steamed Pork Buns/ Bao 菜肉包

Chinese steamed bao differs from its' cousin, the mantou which is usually plain and is just plain dough but is also very delicious when served steaming hot.  Another popular way of serving mantou is to deep-fry them and is also one of my favourite ways of eating them up with or without a dip.  Folklore has it that the legendary General Zhuge Liang when leading his troops back from a hard-won victory invented the original mantou which has evolved into the current mantou and its' many variations e.g. the steamed bao/ baozi.  On their way back home, the troops had to cross a particularly unforgiving river and were informed that they would have to sacrifice some of their men to appease the river spirits.  The General then devised a plan of feeding mantou to the river spirits instead as the buns were made to resemble the shape of human heads and that is apparently how the much-loved mantou and steamed bao came about - interesting is it not?

Homemade Chinese Steamed Pork Buns/ Bao 菜肉包

Anyhow, folklore aside - I hope you'll try making your own steamed bao at home at least once and most importantly, have fun while doing it.  This is now my go-to recipe for making fluffy steamed bao at home and it has yet to fail me or fail to impress my guests :O.  

Fresh Strawberry and Kiwi Fruit Tart (with Pastry Cream)

Sunday, November 13, 2011 | Labels: , , | 25 Comments »

I know that it's no longer spring/ summer in the Northern hemisphere but as you know, it's the opposite in the Southern hemisphere so when I saw some pretty-looking strawberries (from Australia) at the local grocery store, I thought of making something I have not tried making but have always wanted to - the classic and ever-popular fruit tart.  These tarts are probably one of my favourite things to buy when I go into any pastry shop. To be honest, I have been 'cheating' lately and have not baked from scratch for quite a few months so I thought it was about time I made something that didn't call for 'store-bought' and I wanted to make sure my baking 'skills' were not too rusty. There are three main components in a classic fruit tart, the crust, the pastry cream (crème patisserie) and the final assembly of the fruits. This is a dessert best assembled right before serving especially if you're like me and you're not fond of brushing the fruits with glaze. The pastry shell however can be made beforehand and either frozen at the point right before rolling or pre-baked (but of course this will not taste as good as freshly baked ones).

Strawberry and Kiwi Fruit Tart (with Pastry Cream)

For the pastry cream, it is quite very important not to multitask when you're cooking it as you have to remove it from the heat right as it starts to thicken and firm up, if not your pastry cream will most probably end up lumpy.  I actually made my pastry cream twice today as the first time, my cream turned into a lumpy mess since I was too busy trying to do something else at the same time so I only have myself to blame for that. I used strawberries and kiwi fruit for the topping as their natural tartness helps cut into the sweetness and richness of the pastry cream and crust.  Patience is definitely a virtue for this but it was such fun to make not to mention very pretty and delicious.  Admittedly, I did hesitate when slicing the tart as it took such a long time to assemble and it was such a labour of my love for...er baking.  As you can guess, I was hanging out in the kitchen most of the day today and almost contemplated cancelling on my friends, claiming (genuine) fatigue but got dragged out nevertheless.  Hope you all have a lovely weekend!

Photobucket

Notes/ Tips from Jen:

When making the crust, anytime you see that the dough is getting too soft, place it in the fridge for 5-10 minutes before continuing to roll.  The pastry shell I made today was blind-baked which should help to keep sogginess at bay but another thing you can do is to brush the insides of the pastry shell with apricot glaze before adding the pastry cream.

When making the pastry cream, be sure to remove it from the heat immediately as it starts to thicken and firm up to avoid lumpiness.  No amount of whisking after that will help the lumpiness unfortunately.

If you are not serving the fruit tart right after assembly, you can either brush the tops of the fruits with an apricot glaze (see below) or you can lightly toss the fruits in the apricot glaze before placing on the tart.

Fish Bibimbap (Korean Mixed Rice) and Spinach Namul Recipe

Friday, November 11, 2011 | Labels: , , , , , | 16 Comments »

Fish bibimbap is one of the many varieties of the famous Korean rice dish and is particularly easy to make especially if you don't have a lot of banchans (side dishes) in your pantry as preparing a 'full' bibimbap complete with at least a few vegetable banchans, some protein and the obligatory fried egg does take a while.  For my bibimbap today, I grilled some rockfish lightly marinated in soy, sake and a bit of salt, made a quick spinach namul (marinated spinach), sliced up some lettuce and made an easy bibimbap sauce.  Mix it all together and you've got yourself a fabulously satisfying meal that is also easy and quite healthy.  Everyone has a different version of bibimbap sauce that they like and I've just recently discovered that I like adding some rice vinegar, sesame oil, minced garlic, a tiny bit of sugar and some toasted sesame seeds to the gochujang (Korean fermented chili paste) for mine.

Grilled Fish Bibimbap (Korean)

Gochujang is probably one of the most-used Korean condiments together with gochugaru (Korean chili powder) and perhaps doenjang (fermented bean paste).  For bibimbap, gochujang is a must as it will form the base for the sauce that will ensure everything mixes together perfectly.  Gochujang is spicy, earthy and has its' own distinct flavour which I find incredibly appetising. For the fish, I used rock fish but other fishes like salmon, cod and most fishes that can be grilled would make great substitutes.  Apart from the different flavours and textures all intermingling together harmoniously, it is also tremendous fun to mix everything up right before eating.  The sauce is usually served at the table for the guest to add as much or as little as he or she likes.  Add a dash of sesame oil and that's it!

Photobucket

Stir-fried Pork with Tofu in Savoury Bean Sauce Recipe

Wednesday, November 09, 2011 | Labels: , , | 23 Comments »

Today's feature is an extremely simple and well-loved dish in our household - pork and tofu stir-fried with some garlic and green onions in a savoury ground bean sauce.  Ground bean sauce (also known as 'taucu' in Malay) differs from the more prevalent black bean sauce where the former has a relatively milder taste and in terms of texture is slightly creamier.  You can find this sauce sold in jar form usually at most Asian grocery stores in the same aisle as the soy sauces.  This bean sauce packs a good deal of flavours in a neat little package and provides deep umami flavours to an otherwise straightforward Chinese stir-fry dish.  In fact, ground bean sauce has a slightly similar flavour to miso although with a rougher texture. I do hope you give this dish a try soon and if you can't find ground bean sauce, this dish will also work with black bean sauce.

 Stir-fried Pork and Tofu Slices in Savoury Bean Sauce

In addition, I would like to thank everyone for your support about the case of the stealing blogger, over the past couple of days although I vowed not to visit that person's blog, curiosity got the better of me and I actually discovered to my horror that this person not only stole 4 recipes and photos from me but most of her content was stolen from at least 10 bloggers I identified and subsequently informed.  I hope that Google will really look into this as by now there should have been many DMCA complaints filed with them about this individual 'blogger'.  Anyhow, I hope this tiring 'saga' can be put to rest soon - if you find your work stolen by someone else, it is customary to give them a take-down notice and after a day or two, it is totally legitimate for you to file a DMCA complaint to Google via this easy form.


Stir-fried Pork and Tofu Slices in Savoury Bean Sauce


This recipe is part of my Yuen Chun Recipes, an ongoing project on this blog.  The Yuen Chun brand of sauces has been in my family kitchens since the time of my late maternal grandmother, our popo. 

Chinese Beancurd Skin (Fu Chuk) Dessert with Quail Eggs 腐竹鸡蛋糖水 and 'Bloggers' who steal content

Monday, November 07, 2011 | Labels: , , , | 31 Comments »

This is a classic and popular Chinese dessert sweet soup or 糖水 (literally sugar water) which originates from the southern provinces of China.  Beancurd skin or 'fu chuk' is boiled until very soft while beaten eggs added into the sweet soup creates the lovely almost cloud-like effect typical of this popular dessert.  Instead of granulated sugar, it is also customary for the Chinese to use rock sugar in this dessert as the latter is said to have less 'wind-inducing' properties hence better for the body's equilibrium.  For today, apart from the usual beaten regular eggs, I served the dessert with some hard-boiled quail eggs dropped in right before eating.  When hard-boiled, I think that there is no major taste difference between regular chicken eggs and quail eggs but then I had a tray of quail eggs sitting in my fridge forever so I decided to use them up.  They also make a cute presentation I thought.  All in all, a very easy Chinese home-style dessert you can whip up really quick.


Chinese Sweet Beancurd (Fu Chuk) Dessert Soup with Quail Eggs 腐竹鸡蛋糖水 ...

I find that it works better for me if I boil the beancurd skins together with the water instead of waiting for the water to boil before adding the sheets. Funnily enough, I didn't even have to soak the beancurd sheets before hand and they turned out light as feathers in a matter of about 20 minutes.  This sweet soup has relatively milder flavours and is usually popular with most palates.

Chinese Beancurd (Fu Chuk) Dessert with Hard-Boiled Quail Eggs 腐竹鸡蛋糖水 ...

In other not-so-good news, I have been rather busy with a lot of copyright violations ever since I discovered Mozilla's 'who stole my photo' add-on, I highly recommend this by the way.  You will be amazed if you run this application with your photos, I was shocked at all the copying that has been going on from charity organizations to personal bloggers (there was one who copied my recipe word for word and used the photo, cropping it off at weird angles just to get rid of my watermarks) to a fairly large company.  The funniest part was that the blogger who has been copying me started in year 2008 when I was still living in the US and she even has a facebook fan page, just incredible.  I do have to warn you though that it could get addictive as you find out more and more 'dirt' and rather stressful as you see your hard work splashed across a stranger's website claiming your work for their own in such a carefree manner.

Just for laughs, I would be really interested in how she crops this one:

Photobucket

I think this Malaysian 'blogger' requires some special mention and she is Asia Deli, I saw someone else also commenting on her Facebook fan page that she cropped off her watermark as well to make the photo 'hers' so don't be surprised if you find your content on her 'blog' as well.  I have to say that it was not fun at all seeing my work spread across her pages with my watermarks on my photos cropped off each time, watermark at the center of the photo? No worries! Just show the bottom half of the dish!  Watermark on the bottom of the plate? No worries! Just crop off part of the plate so that it looks like it's floating on air, I mean I guess composition of a photo is the least of her concerns right?  Rather vile behaviour I must say.  If you have any questions on how to go about this incredibly unpleasant part of blogging, leave me a comment here or email me.

Oh right, let's get back to more pleasant things, on with the dessert :)

Korean Army Stew - Budae Jjigae 부대찌개

Saturday, November 05, 2011 | Labels: , , , | 10 Comments »

Budae Jjigae or loosely translated as army-base stew has very humble yet interesting origins.  I read and heard that this stew came about as a result of creative and resilient Koreans living mostly in the Ujeongbu area (where the US army base was located) making use of whatever ingredients they could get their hands on in those scarce times.  I think there are many versions of this famous stew and the meat used is usually sausages, franks and spam while vegetables could be anything ranging from beansprouts to cabbage.  For today, in keeping with the spirit of the dish ever so loosely, I only used what I had on hand namely, some chicken frankfurters, green onions, garlic, onions, ripe kimchi and some ramen.  I believe that ramen is a modern addition as back in the early 1950's, ramen was not massively introduced in Korea yet.


Korean Army Base Stew or Budae Jjigae 부대찌개

Admittedly, I am used to the more traditional Korean stews but the frankfurters (or sausages) worked really well in this gochujang-based stew, the franks added a delicious smoky flavour that on first thought may not work with traditional Korean condiments.  This is an appetizing and vibrant stew, definitely comforting especially in cold weather and to me very heart-warming.

Korean Army Base Stew or Budae Jjigae 부대찌개

Singapore Stir-fried Rice Noodles 星洲炒米

Thursday, November 03, 2011 | Labels: , , , , , | 9 Comments »

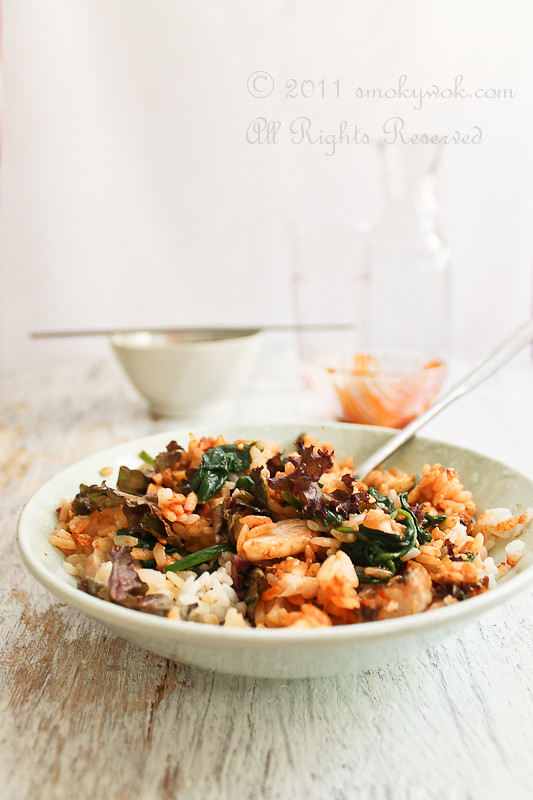
Today's feature is the famous Singapore stir-fried rice noodles - this appetizing noodle dish combines spicy, savoury, tangy and slightly sweet flavours in a neat little dish and is also incredibly easy to whip up at home but do note that there are quite a few ingredients needed for the sauce. Singapore fried noodles are usually stir-fried with Chinese BBQ pork, shrimp and beansprouts although of course you can be creative and come up with your own combination, having said that I think that the Chinese BBQ Pork (Char Siew) adds to the slight sweetness of the dish and really personifies Singapore stir-fried noodles. For today's post though, I cheated and used a ready-to-cook sauce and for those of you without access to sauces, I included my recipe to recreate this easy noodle dish at home below. Whenever I use ready-to-cook sauces, I cannot resist adding my own little accents and for today, it was no different.

Singapore Stir-fried Rice Noodles 星洲炒米

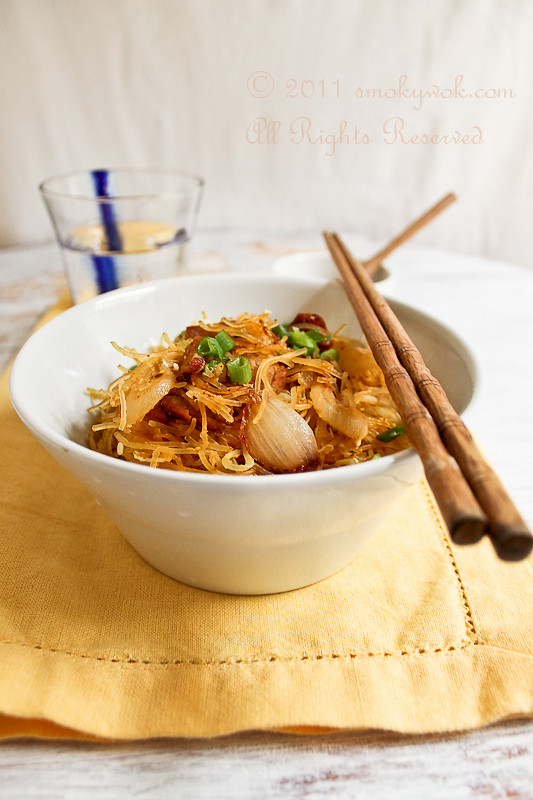
To kick up the heat factor a notch, I added chili and curry paste and some bird's eye chili peppers. I find that using soy sauce makes for a more flavourful dish as well and for tanginess, I added some ketchup and chili sauce. What I like about most good ready-to-cook sauces is that they give you a good base to expand on and allow you to put in your own little signature touches with lesser work in the kitchen. At the final step, I added eggs into the noodles as that's how I like my Singapore noodles but alternatively, you can serve the noodles with some shredded omelet.

Serves 4

Ingredients:

200g rice noodles or meehoon/ bihun

1 cup of diced Chinese BBQ Pork
2 garlic cloves, sliced or roughly chopped
1 small onion, sliced
1 cup of beansprouts
1-2 bird's eye chili peppers, sliced (optional)
1 bottle of Singapore Noodle Sauce* + 1/4 cup water
2 tbsps light soy sauce, add more if required
1 tbsp curry powder, mixed with 3 tbsps water
1 tbsp chili powder mixed with 3 tbsps water
1 tbsp chili sauce
1 tsp sugar
Cooking oil, about 4 tbsps used separately
1 stalk green onion, sliced for garnish (optional)
2 eggs

*Alternate sauce recipe (Mix the ingredients below together)

4 tbsps curry powder
1 tbsp chili powder
2 tbsps chili sauce
1 tbsp ketchup
1 tsp turmeric powder
3 cloves garlic, minced
4 tbsps light soy sauce (or add more to taste)
1 tsp sugar
1 tbsp cooking oil
1 cup chicken broth (or use chicken cubes mixed with water if easier)

Method:

Firstly, soak the rice noodles in warm water for at least 30 minutes to soften. Once the noodles have softened, drain and set aside.

Heat your wok until almost smoking. Add 2 tbsps of oil. Turn heat to medium and add the diced BBQ pork. Fry until lightly browned, dish out and set aside.

Clean your wok briefly. Heat wok again until almost smoking and add another 2 tbsps of cooking oil. Add onions, chili pepper slices and garlic. Turn heat to low and stir-fry until aromatic. Pour in the sauce (either World Food's or the alternative I offered) and bring to a boil.

Once the sauce is boiling, add in the rice noodles and allow the noodles to soak up the sauce for about 30 seconds, then add in the beansprouts. Once the liquid is almost completely gone, add in the diced BBQ pork and mix well with either a pair of chopsticks or tongs - it's better not to use a spatula to minimise breakage of the noodles. You should do a taste test at this point and add more soy sauce if required. As you are frying the noodles, if it looks a little too dry, go ahead and add a bit of oil from the sides of the wok which will also make for easier stir-frying as you go along.

When you are satisfied with the flavour of the noodles, crack the eggs into the noodles and stir into the noodles well. Dish out and garnish with some green onion slices if desired.

Singapore Stir-fried Rice Noodles 星洲炒米

Notes:

If you like, you can add some small shrimp as well. Dried tofu slices are also another popular addition. These noodles can also be served with a squirt of fresh lime juice (usually done at the table right before eating).

Please note that it is illegal under DMCA to remove watermarks or modify images and images appearing online are not 'public property' There are copyright laws in place.

Smoked Salmon and Creamy Eggs Baguette 'Sandwich'

Wednesday, November 02, 2011 | Labels: , , | 15 Comments »

This was my lazy breakfast last Sunday and honestly, I can't really call this a recipe as this was just so easy to put together so perhaps a breakfast idea would be more accurate.  I still had some smoked salmon in my fridge left over from my soba dish hence I decided to have some for my breakfast last Sunday.  This is an open-faced sandwich if you will and I got the idea from a quaint Italian cafe I used to frequent while studying in London (which served the best cappucinos by the way!) which I was reminded of when I was going through some old photo albums.  Eating this totally brought back memories of my (relatively) carefree days in university - I still remember my tears when I saw my parents hop into the black London cab headed to Heathrow for their return to Malaysia when I was left behind in London,, Butler's Wharf to be exact which is where my hall was.  I vividly remember crossing the Tower Bridge everyday to get to the Tower Hill tube station in the dreary weather.   Not surprisingly, I of course miss London now - how typical of human nature!

Photobucket

Anyhow, I digress.  Now back to the food - for a richer version of scrambled eggs, I added some pouring cream into the egg mixture before scrambling them up with some butter.  Instead of baguette slices, you can also toast up some English muffins which will be excellent with the eggs and smoked salmon as well.  I hope you all had a good week and perhaps you'll give this idea a try the next time you crave something easy but a little different for a lazy Sunday breakfast.  Now that I come to think of it, this was like a lazy man's Egg Florentine no?

Related Posts Plugin for WordPress, Blogger...
Creative Commons Licence
Smoky Wok by Smoky Wok is licensed under a Creative Commons Attribution 3.0 Unported License.
Based on a work at www.smokywok.com.
No content from this website including images, recipes, writings may be reproduced without prior consent from the author.


Smoky Wok

Smoky Wok

Smoky Wok